
Rose Petal Mala
Rose petals are often used in the worship of Divine Mother and in pujas. Roses have long been a symbol of love and beauty and the word “bead” originally meant “prayer”.
A mala has 108 beads, which is considered a holy number because that is the number of Divine Mother’s names. “The mala is used to assist in counting the repetitions of the name of a Divine aspect such as Siva or Divine Mother. The purpose of such repetition, as in the chanting of all mantras, is to control the constant conversations that go on in the mind, which the yogi calls mental background noises.”[1]
“The practice of the mala has therapeutic value because of its effects of concentrating the mind, directing the emotions and focusing the body, all of which lead to the spiritual realm.”[2]
Creating your own rose mala from rose petals is a practice of patience and devotion.
While living at the Ashram in the summer of 2011, Gordon Matchett, a Karma Yogi and Yasodhara Yoga teacher, decided to make a rose petal mala.“The malas are pretty simple, but time consuming to make. It’s lots of trial and error, some good intuition and a whole bunch of practice and patience. Kind of like our practice,” says Gordon.
Directions
- Collect fresh rose petals – as little stem, leaf, grass and insect in them as possible
Gordon collected his rose petals from around the Temple – it was part of his practice and became a part of the story of the mala. Create your own ritual for collecting rose petals.
2. Freeze the petals in plastic freezer bags. Gordon collected a second batch that stayed in the freezer for over a year with no problems.
The rose petals may also be dried in order to store them. It takes a little more work, and when you’re ready to process them, you’ll need to re-hydrate them.
3. The first part of processing is blending the petals. Gordon mixed water and rose petals together and blended until he had a rose-petal smoothy type mix (a little thinner than a milkshake). Submersion and normal blenders for this task – either works fine. Blend till all the chunks are gone and don’t worry about over blending.
4. The next part is cooking the petals. The longer you cook them, the better. The goal is to break down all the cellulite so they will form into nice smooth beads. Longer cooking = smoother drying. Simmer the petals and do not let them boil (boiling releases the fragrance and would reduce the lovely smell of the beads).
Use an enameled pan, if one is available. A cast iron pan works as well but it will turn the petals a deep burgundy. Using aluminum or other metal pans can affect the quality and colour of the beads.
Gordon cooked his petals in a cast iron frying pan, on low heat, stirring quite regularly. Do this for an hour at a time, two or three times a day for a couple of weeks. A labour of love.
Option: Gordon did a few rounds of cooking in his “good old ceramic slow cooker”. He put them on the lowest setting and left them on overnight. And he repeated this most nights for a couple of weeks. Much easier and left the house smelling fantastic.
5. Once the cellulite is ‘cooked’ out of the roses, it’s time to reduce, reduce, reduce. Keep applying low heat till the mix is clay-like and formable. The more water removed at this stage, the quicker the drying time and the less shrinkage and bumpiness you’ll have in your beads.
You may choose to add a few drops of rose oil (essential oil) at this stage.
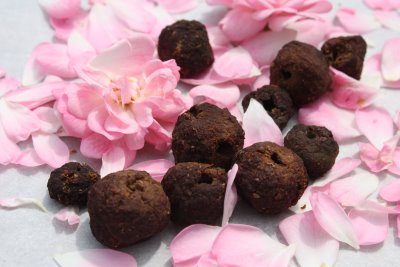
6. Form small beads with the rose mixture. This one is a trial and error process because every batch is different. The length of time blended, cooked, the degree that water was removed, and even the amount of leaves in the mix can all impact how quickly and smoothly the beads dry. “One thing I know is that they will shrink by around 50% (maybe more, maybe less).”
7. So, here’s what Gordon did. He made a couple of beads and dried them just to see how it worked! As these beads were drying, the rose petal paste can be in the freezer resting. Then he figured out if the paste needed to dry out more, or cook it more, or make bigger or smaller bead balls. If the beads dry in odd shapes (not balls) it’s likely that there’s more cellulite to be broken down … cook them longer.
8. Great part about working with roses, is that if you make a mistake, you just rehydrate the beads, and add them back into the mass. This was Gordon’s experience for about 1/2 of the beads he worked with the first time.
9. When you have 108 or so tightly rolled balls of rose paste let them dry half way out. Gordon left them on a cookie tray in a warm, sunny room for a few days.
10. When the beads are kind of solid, but still pliable, pierce them with a large needle to create an opening for the thread. You want to make sure the hole is big enough for whatever thread you plan to use.
11. Now you can let them dry out the rest of the way. Dry them in a gas oven that has a pilot light or lay them on a paper towel for a day or so. Gordon put his in the oven, overnight, with just the pilot light on. One oven had granola, the other roses.
12. That’s it, the beads are ready to string. Process from start to finish can take up to three or four weeks.
Materials
- Rose petals – start with four cups or more (Choose lighter petals for lighter beads, darker petals will dry into a rich ebony colour)
- Blender
- Saucepan or skillet for simmering petals (enameled pan or cast iron for darker beads)
- Water
- Spoon
- Rose oil
- Pins or needle to create holes
- Thread for beading
Comments are closed.